Creating ringtones on iPhone
If you have an iPhone, you have free access to the GarageBand app for iOS. Better still, you don’t have to be a GarageBand expert to create custom ringtones.
Install GarageBand, Find Song
Download GarageBand from the App Store if you haven’t yet done so.
Tap Continue on the main GarageBand app, then Continue again if this is the first time you’ll use the app.
Once GarageBand has been installed:
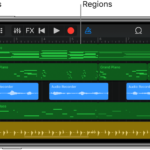
Tap Tracks at the top of the app.
Choose Audio Recorder by swiping right.
Select the Multitrack button at the top left. It’s the third one in the series.
Next:
Choose the Looper button at the top right. It’s the second from last.
Tap Music from the pop-up.
Select the song you wish to use for your ringtone. You can search through Albums, Artists, Genres, Playlists, and Songs. You can only use downloaded iTunes music. Due to copyright, you can’t use Apple Music songs.
Drag the song into GarageBand.
Edit Your Song
Your ringtone should be no more than 30 seconds long. Most likely, the song that you selected is well beyond that length. Therefore, you must edit it by selecting your favorite part of the song.
Push the Play button at the top of the screen and listen to your song; decide which section to use for your ringtone.
Separately, grab both ends of the song and push them inward so that only your favorite part of the song remains.
Press the Play button again to confirm your ringtone.
Tap the My Songs button at the top left. It’s the first one on the list.
Choose My Songs.
Change the Name, Export the File
Long press the clip you just saved.
Choose Rename from the menu.
Give your clip a name.
Tap Done.
More info here: GroovyPost
Feb 22 2022
Creating ringtones on iPhone
Creating ringtones on iPhone
If you have an iPhone, you have free access to the GarageBand app for iOS. Better still, you don’t have to be a GarageBand expert to create custom ringtones.
Install GarageBand, Find Song
Download GarageBand from the App Store if you haven’t yet done so.
Tap Continue on the main GarageBand app, then Continue again if this is the first time you’ll use the app.
Once GarageBand has been installed:
Tap Tracks at the top of the app.
Choose Audio Recorder by swiping right.
Select the Multitrack button at the top left. It’s the third one in the series.
Next:
Choose the Looper button at the top right. It’s the second from last.
Tap Music from the pop-up.
Select the song you wish to use for your ringtone. You can search through Albums, Artists, Genres, Playlists, and Songs. You can only use downloaded iTunes music. Due to copyright, you can’t use Apple Music songs.
Drag the song into GarageBand.
Edit Your Song
Your ringtone should be no more than 30 seconds long. Most likely, the song that you selected is well beyond that length. Therefore, you must edit it by selecting your favorite part of the song.
Push the Play button at the top of the screen and listen to your song; decide which section to use for your ringtone.
Separately, grab both ends of the song and push them inward so that only your favorite part of the song remains.
Press the Play button again to confirm your ringtone.
Tap the My Songs button at the top left. It’s the first one on the list.
Choose My Songs.
Change the Name, Export the File
Long press the clip you just saved.
Choose Rename from the menu.
Give your clip a name.
Tap Done.
More info here: GroovyPost
By billieh • Ringtones